Sparkling Water Makers: How to Choose One
Choose a sparkling water maker by matching its controls, approved bottles, and CO2 refill route to your daily routine. Start with the control you prefer, then check bottle care, working clearance, and replacement supplies.
On this page (12 sections)
- What should you compare in a sparkling water maker?
- Is a manual or electric sparkling water maker better?
- What bottle type should you choose?
- Which CO2 cylinder connection do you need?
- How much counter space does a sparkling water maker need?
- How do you set up and use a sparkling water maker?
- How should you clean and care for the bottles?
- Which common mistakes should you avoid?
- What ongoing costs should you account for?
- Are sparkling water makers worth it for your household?
- How do you choose the right sparkling water maker?
- How we researched this sparkling water maker guide
Choose a sparkling water maker by matching its controls, approved bottles, and CO2 refill route to your daily routine. The right choice makes it easy to chill water, carbonate a bottle, and replace supplies without adding an awkward chore.
Start with what you already drink. A household that finishes plain seltzer every evening needs a different bottle routine from someone making an occasional flavored drink.
Next, decide which action you prefer: a button press, a lever pull, or powered controls. Then check whether the bottles fit your fridge and whether you can replace the correct cylinder nearby or by delivery.
This guide covers those choices, the differences between 4 machines, and the setup and care habits that keep the routine manageable. For a shorter model shortlist, see our best sparkling water makers.
What should you compare in a sparkling water maker?
Compare controls, bottle fit, CO2 access, and working space before choosing a machine. These affect every batch, while a finish or bundle extra may matter only at checkout.
| Choice | What to check | Why it matters |
|---|---|---|
| Carbonation controls | Press, lever, or powered controls | Determines how you set the fizz |
| Approved bottles | Material, usable fill level, and cleaning method | Affects chilling, serving, and washing |
| CO2 system | Connection type and exchange access | Determines how you replace the gas |
| Working space | Dimensions plus room for normal use | Keeps bottle attachment and cylinder swaps accessible |
| Bundle contents | Exact bottles, cylinders, and flavor extras | Shows which supplies you still need |
| Replacement supplies | Approved bottles and cylinders you can obtain | Helps you plan for ongoing use |
Put each choice into your actual kitchen routine. If bottles must wait for a full dishwasher load, you may need more than one in rotation.
If your nearest exchange point requires a special trip, the refill route deserves more weight than a small difference in machine width. A machine without gas cannot make the next bottle.
Decide which requirements are firm before comparing designs. Wanting glass bottles, avoiding an outlet, or using a particular cylinder system can narrow the field quickly.
Leave optional extras until last. Flavor drops can help you explore drinks, but they do not solve an inconvenient bottle or cylinder system.
A useful final check is to picture the whole process: take cold water from the fridge, attach the bottle, carbonate, serve, wash, and store. Any step you cannot comfortably picture deserves another look before you choose.
Is a manual or electric sparkling water maker better?
Choose manual controls for direct control of each press or pull, and consider electric controls if you prefer powered operation. Neither label tells you everything about bottle attachment, cleaning, or cylinder changes.
A manual machine lets you build carbonation through the action described in its instructions. You still need to learn the approved sequence rather than pressing repeatedly without a plan.
Powered controls vary by model. Check the available settings and outlet requirements rather than assuming every electric machine offers the same routine.
Someone who likes making each drink a little differently may enjoy a manual control. Someone who wants a defined control sequence should compare the exact settings of any powered model under consideration.
Manual sparkling water maker options to compare
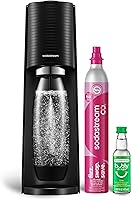
The SodaStream Terra Value Bundle suits buyers who want a straightforward press control and easy cylinder changes. It uses push-in Quick Connect CO2 cylinders and includes dishwasher-safe BPA-free bottles plus bubly flavor drops.
Choose the Terra if you mostly want plain or flavored sparkling water and prefer a press to a lever. Its included reusable bottles support a rotation between chilling, drinking, and washing.
Skip it if glass bottles are a firm requirement or you specifically want powered carbonation controls. Make those decisions first rather than hoping to change the machine's bottle system later.
The SodaStream ART Value Bundle suits buyers who prefer a lever and want a retro-inspired machine to leave on the counter. It uses Quick Connect cylinders and includes dishwasher-safe BPA-free bottles and bubly flavor drops.
Choose the ART when the lever is the control you would rather use each day. Its styling can also matter if the machine will remain beside your kettle or coffee maker.
Skip it if you prefer a press or if the lever would be awkward to reach in your chosen spot. There is no reason to choose a control you dislike just for the appearance.
The Aarke Carbonator 3 suits buyers who want a stainless steel enclosure and an electricity-free lever machine. It uses screw-in cylinder installation and includes an 800 ml BPA-free PET bottle.
Choose the Aarke if its enclosure and lever are features you value and screw-in CO2 fits your refill plans. The included components are the carbonator, manual, and PET bottle, so arrange a compatible cylinder before first use.
Skip it if your priority is glass bottles or a Quick Connect cylinder system. A stainless steel machine body does not change the material of the included bottle.
For the broader power choice, read our electric sparkling water makers guide. Confirm controls and power requirements for the exact model, especially when a model name could suggest more than its supplied details establish.
The Terra and ART bundle descriptions differ on bottle and cylinder counts, so confirm the exact package contents before ordering. Count only the supplies you know will arrive when planning your first refill and bottle rotation.
What bottle type should you choose?
Choose approved bottles that fit your serving, fridge, and washing routine. Material matters, but compatibility comes first because a carbonating bottle must be designed for the machine using it.
Plastic may suit a household that wants to move bottles between the kitchen and fridge. Glass may appeal if you prefer serving water at the table in a glass bottle.
Neither preference overrides the machine's approval requirements. An ordinary drinks bottle is not a substitute for a pressure-rated carbonating bottle.
When a glass and plastic bottle package makes sense
The SodaStream E-Duo suits buyers who want both bottle materials in the package. It includes a 1L glass bottle, a 1L dishwasher-safe BPA-free reusable carbonating bottle, and 1 60L CO2 cylinder.
Choose it if you want the option of glass for serving and plastic for another part of your routine. Plan where both bottles will chill and dry rather than assuming the second bottle will fit beside the first.
Skip it if your main requirement is a specific powered control feature that you have not confirmed for this exact model. Check its controls and power needs before making that part of the buying decision.
Its included glass bottle is distinct from the separate SodaStream glass carafe, which is excluded from compatibility. Similar names within a brand do not establish that bottles are interchangeable.
For more detail, see sparkling water makers with glass bottles and our glass vs plastic bottle guide.
Match bottle size to the amount you actually drink
Choose bottle size around a normal sitting, not the largest capacity available. If you usually pour one small glass, a large batch may spend longer being opened and closed before you finish it.
A bottle's stated capacity and its carbonation fill line are different measurements. Leave the required headspace even if the bottle can physically hold more water.
Check fridge shelf height with the cap attached. Also leave a stable place for bottles to dry, since a bottle rotation needs space outside the fridge too.
Which CO2 cylinder connection do you need?
Use the cylinder approved for your exact machine, with the correct connection. Quick Connect and screw-in fittings are different systems, and a familiar brand name does not make them interchangeable.
Keep the model name and approved cylinder type together in a note. That makes it easier to choose the correct refill without relying on memory or a cylinder's general appearance.
Check exchange access before buying the machine. Ask whether the service handles your connection type, accepts your empty cylinder, and offers the collection or delivery method you need.
A nearby retailer is useful only if its exchange service matches your cylinder. SodaStream offers exchanges at participating retailers, but you should check the options available in your area.
Read how SodaStream CO2 exchange works and SodaStream refill options near you before settling on a system.
Decide whether a spare cylinder would help
A spare cylinder suits households that want to keep making water while an empty is being exchanged. It is less useful if you have no suitable storage space or use the machine too rarely to need that buffer.
Think about the time between noticing weak carbonation and obtaining replacement gas. A delivery or shop trip that takes several days changes how useful a spare will be.
Store cylinders according to their safety instructions, away from heat, and keep them secure. Do not force an incompatible fitting or improvise a way to connect it.
During a change, follow the machine's sequence for removing the empty and installing the replacement. If the fitting resists, stop and check alignment and compatibility rather than using extra force.
How much counter space does a sparkling water maker need?
Measure the space needed to operate the machine, not just the space occupied by its base. You need access to the control, bottle attachment, and cylinder compartment.
The SodaStream ART Value Bundle measures 9.6 in deep, 6.8 in wide, and 16.9 in high. The Aarke Carbonator 3 measures 10.16 in deep, 6.02 in wide, and 16.3 in high.
Those measurements describe the machines themselves. Allow additional clearance for the movement required by your chosen model.
Check the working position under cabinets
A machine may fit under a cabinet yet still be awkward to use there. Check whether the bottle must tilt, lift, or move forward during attachment and removal.
Leave room for your hand around the control. For a lever machine, consider the lever's travel rather than judging the fit from a still photo.
Also check how you will reach the cylinder compartment. If you must move the machine for every swap, make sure you can do so without clearing several other appliances.
Give the supplies a home too
Reserve space for cold water, drying bottles, caps, and any spare cylinder. These items are part of the setup even though they do not appear in the machine's footprint.
If you plan to put the machine away between uses, consider how often you will actually take it out. Daily use is easier when the storage spot is close and accessible.
For an electric model, include the outlet and cord route in the space check. A convenient patch of counter may still be a poor location if it leaves the cord stretched across your work area.
How do you set up and use a sparkling water maker?
Start with chilled plain water, an approved bottle, and a correctly installed cylinder. Follow your exact machine's instructions for attachment, carbonation, pressure release, and removal.
Cold water holds dissolved CO2 better than warm water. Chilling the water before carbonation helps you build fizz without starting from a warm bottle.
Carbonation does not filter or purify water. Use water that is safe to drink and that you already like the taste of, since bubbles will not remove an unwanted flavor.
Before the first bottle
Read the instructions before fitting the cylinder or attaching a bottle. Different connection systems can require different movements, even when the machines look similar.
Wash the bottle and cap using their approved care method. Check for damage and any marked replacement date before putting the bottle into use.
Set the machine on a stable, level surface. Keep the instructions available until the attachment and release steps feel familiar.
For a fuller walkthrough of the general process, see how to carbonate water at home.
Fill and attach the bottle correctly
Fill only to the marked carbonation line. The empty space above the water is part of the intended setup, so do not fill to the neck to make a larger batch.
Attach the bottle exactly as directed. A bottle that looks close to the right position may still need another movement before it is properly secured.
Keep flavor drops, syrup, fruit, and juice out of the carbonation step unless your exact machine expressly permits them. For the Terra and ART, add flavors after carbonating plain water.
Find a fizz level you can repeat
Begin with the manufacturer's recommended sequence. If the instructions allow adjustment, change one part of the sequence at a time rather than making several extra presses at once.
Keep the starting water temperature similar from batch to batch. That makes it easier to judge whether a change in carbonation matches your preference.
Release pressure and remove the bottle only as directed. Do not rush removal while the machine is still releasing gas.
Taste a small pour before adding flavor. Once you find a fizz level you like, keep that process as your usual starting point.
Add flavor and store the rest
Add flavor slowly after carbonation and mix gently as directed. Pouring syrup quickly or shaking a fizzy bottle can create foam and make a mess.
Cap unused sparkling water promptly and keep it chilled. Repeated opening, warm storage, and vigorous handling can all reduce the fizz left for the next glass.
How should you clean and care for the bottles?
Use the cleaning method approved for each bottle and cap, and let the parts dry before storage. Dishwasher safety belongs to the specific bottle, not every bottle sold under the same brand.
A bottle used only for plain water still needs regular cleaning. Pay attention to the mouth, threads, and cap, where residue and moisture can remain.
If you flavor drinks in the bottle, wash it promptly afterward. Syrup residue is easier to remove before it dries around the neck or cap.
Keep a simple bottle rotation
A useful routine is one bottle chilling while another is being used or washed. Add bottles only when your household's drinking and washing habits make them useful.
Follow the approved dishwasher position and temperature limits for bottles marked dishwasher safe. For other bottles, use the cleaning method in their care instructions.
Use a suitable bottle brush if permitted, with mild dish soap and a thorough rinse. Avoid abrasive tools that could scratch the bottle or sealing surfaces.
Our guide to cleaning SodaStream bottles covers the washing routine in more detail.
Check condition before carbonation
Look for cracks, deep scratches, distortion, or damage around the neck and base. Replace a damaged bottle rather than trying to keep using it under pressure.
Follow any marked replacement date on a plastic carbonating bottle, even if its appearance seems unchanged. Appearance alone cannot establish that a pressure bottle remains suitable for use.
Inspect glass for chips and cracks too. A damaged glass bottle should not be returned to carbonation use.
Clean the machine without soaking it
Wipe spills from the exterior using the method in the machine's instructions. Do not immerse the machine or pour water into the cylinder compartment.
Keep the bottle attachment area clear of dried drink residue. If you see a leak or damage, consult the troubleshooting instructions before continuing.
Let washed bottles drain fully and store caps so moisture can escape. Avoid sealing a damp bottle for long storage.
Which common mistakes should you avoid?
Avoid overfilling, unapproved bottles, and flavored liquids during water-only carbonation. These mistakes can cause overflow, poor results, or unsafe use.
Most routine problems are easier to solve by returning to the correct fill line and attachment sequence. Adding more gas without checking those basics can waste CO2.
Treating a cylinder's size as guaranteed output
SodaStream says each 60L cylinder for the Terra, ART, and E-Duo can carbonate up to 60 liters of water. Actual output depends in part on how much carbonation you add.
Stronger fizz uses more gas per batch. Compare refill needs using your preferred drink rather than assuming every cylinder will reach the maximum stated yield.
Trying to fix every weak bottle with more presses
Check that the water is cold and the bottle is attached correctly before changing the carbonation sequence. A nearly empty cylinder may also be the cause.
If gas escapes unexpectedly or water repeatedly overflows, stop and use the manufacturer's troubleshooting steps. Do not keep pressing to compensate for a possible fit or seal problem.
Assuming any same-brand bottle will fit
Match the exact bottle to the exact machine. Capacity, color, and brand are not enough to establish compatibility.
The same rule applies to cylinders. Keep your approved supply details handy so a replacement order does not become guesswork.
Confusing flavored water with permission to carbonate flavors
A machine that lets you make a flavored drink may still require plain water during carbonation. Add ingredients afterward unless its instructions explicitly permit another method.
If your main aim is carbonating juice or other drinks directly, choose a machine whose instructions clearly allow that use. Do not adapt a water-only process by trial and error.
What ongoing costs should you account for?
Plan for CO2 exchanges, approved replacement bottles, and optional flavors. The machine is only the starting expense, and bundle extras do not remove the need for future supplies.
Separate essentials from preferences. Gas and serviceable approved bottles are necessary, while flavor drops and syrups depend on what you want to drink.
A spare cylinder is a continuity choice. An extra bottle is a chilling and washing choice, so decide on each for a specific reason.
Compare the whole refill routine
Include any delivery fees, return requirements, and travel involved in getting replacement gas. A convenient refill route can matter more than an attractive starter package.
SodaStream offers a mail return option for CO2 exchanges. Check whether it serves your location and cylinder type, along with the return steps you must follow.
Keep enough room to store empties until you return them. An exchange system works best when returning the empty becomes part of the same routine as obtaining the full cylinder.
See our guide to sparkling water maker costs for a fuller breakdown of the machine, gas, bottles, and flavors.
Compare like-for-like drinks
Compare plain homemade sparkling water with plain store-bought sparkling water. If you usually add syrup, include that habit rather than treating flavored drinks as if they cost the same as plain water.
Do not assume a fixed savings result for every household. Your use, preferred fizz, replacement supplies, and refill route all affect the comparison.
Are sparkling water makers worth it for your household?
A sparkling water maker is most useful when you already drink sparkling water regularly and can maintain its supplies. It is less compelling for occasional use if the machine and bottles will mostly occupy storage space.
Look at a normal week rather than an ideal future habit. Count how often you want sparkling water, how many people drink it, and whether they want it at the same time.
A good fit for regular home use
Frequent home drinkers can make carbonation part of an existing fridge and dishwashing routine. The benefit is having control over when to make a batch and how much fizz to add.
A shared household should also consider who will refill water, wash bottles, and exchange gas. Simple responsibilities help prevent the machine from sitting unused with an empty cylinder.
A weaker fit for occasional or inconvenient use
If you drink seltzer only for guests, compare the storage and care involved with keeping a few ready-made drinks available. A machine still needs compatible supplies even when use is rare.
You may also prefer another option if your fridge cannot hold approved bottles or your refill route is difficult. Solve those issues before choosing a machine by its looks.
For the broader tradeoffs, read is SodaStream worth it? and compare SodaStream with buying sparkling water.
How do you choose the right sparkling water maker?
Choose the sparkling water maker whose controls, bottles, and refill route you will use comfortably every week. Use the differences below to make the final choice rather than treating every machine as a substitute for the others.
- Choose the Terra if you want a press control and a reusable-bottle routine without making countertop styling the main decision.
- Choose the ART if you prefer a lever and want its retro-inspired appearance in a permanent counter spot.
- Choose the Aarke Carbonator 3 if you value its stainless steel enclosure and want an electricity-free lever machine with a screw-in cylinder system.
- Choose the E-Duo if the included glass and plastic bottle combination fits how you serve and store water.
Rule out any model that fails a firm requirement first. Glass compatibility, cylinder access, and working clearance matter more than extras you might rarely use.
Then settle the practical details: where water will chill, where bottles will dry, and how replacement gas will arrive. Confirm that the package gives you what you need for the first batch.
If 2 choices remain, favor the control and care routine you prefer. Use our best sparkling water makers to compare the remaining options.
How we researched this sparkling water maker guide
We compared controls, bottle materials, cylinder connections, dimensions, and included supplies to identify which choices suit different routines. Where details conflict or affect compatibility, the guide points out the specific check needed before buying or use.
Frequently asked questions
What should I look for in a sparkling water maker?
Choose a sparkling water maker by its controls, approved bottles, and CO2 replacement route; then measure the space needed to attach bottles and change cylinders. Check cleaning instructions and replacement bottle availability, since those affect daily use long after you choose the machine.
Are manual or electric sparkling water makers better?
Manual makers suit people who want to set carbonation with a press or lever; electric models suit buyers who prefer powered controls, though features vary by model. Compare the exact controls, outlet needs, bottle fit, and working clearance rather than assuming either type makes stronger or better sparkling water.
Can you carbonate drinks other than water?
Use plain water unless the instructions for your exact machine explicitly allow other liquids; for the Terra and ART, carbonate water first and add flavor afterward. Juice, syrup, and other ingredients can cause excessive foaming in a machine intended for water, so permission to flavor afterward does not mean permission to carbonate them.
How do you know which CO2 cylinder fits?
Match the cylinder connection to the exact machine, then confirm the approved cylinder with the manufacturer; Quick Connect and screw-in fittings are different systems. Before ordering a spare, check that your chosen exchange service handles that type and accepts the empty cylinder you will return.
Are glass bottles compatible with every sparkling water maker?
No, glass bottles work only in machines designed for the exact approved bottle; similar shape, capacity, or branding does not establish compatibility. Choose a machine that supports glass from the start if that matters to you, and never substitute an ordinary glass drinks bottle for a carbonating bottle.
Why does homemade sparkling water sometimes taste flat?
Warm water, a loose storage cap, or a nearly empty cylinder can leave your drink with less fizz than expected; start with chilled plain water and follow the fill line and carbonation sequence. If fizz stays weak, check bottle attachment and cylinder installation using the machine's troubleshooting instructions.